
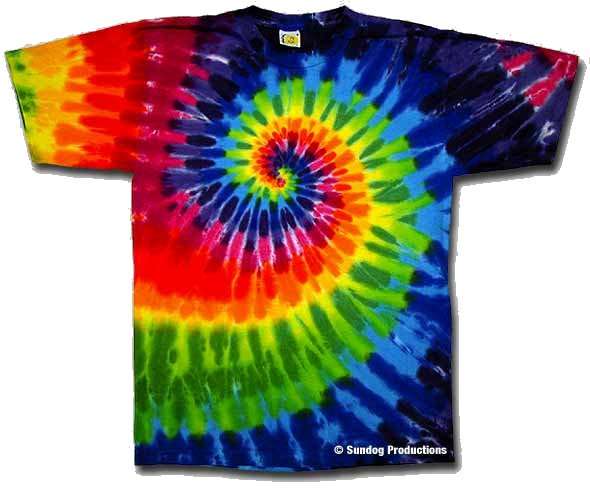
28 May How to Tie Dye a T-Shirt
Tie dye shirts are a fun and festive way to transform old tees into rainbow masterpieces. See how easy it is to create your own tie-dye shirt.
When I was a kid tie dye t-shirts were the cool thing, and everyone tried it at least once. But, I grew up in the 70’s so I guess it was on trend with the time. But, I still see folks wearing tie dye t-shirts around today that they purchased from the store. Perhaps they’re not sure how to do it. So here is an easy to try method to DIY your own.
The best shirts are 100% cotton. 50% cotton/50% polyester can also be used in a pinch, but cotton works best.. Colors absorb into the fabric best if it’s natural fiber, and it will look much more vibrant. Use an old comfortable cotton t-shirt if you have one. If it’s not perfect that’s ok because the tie dye colors will cover any stains or other issues. Rubber bands are the best choice for preparing the tee.
Preparing the t-shirt
Choose a white or light-colored t-shirt: Light-colored fabrics will be easier to dye and the colors will appear brighter.
Pre-soak (optional): Some dye kits recommend pre-soaking the shirt in a solution of soda ash and water to help the dye adhere better.
Wash the shirt: Ensure the fabric is clean and free of any sizing.
To bond Procion dyes with a shirt, soak it in a warm water and soda ash solution for 10 minutes. Follow the instructions and avoid using too hot or cold water. Add salt and ensure the mixture is thoroughly dissolved before adding the shirt. Wear rubber gloves as the soda ash is slightly caustic. After soaking, wring the shirt out thoroughly to allow more dye to enter. Spin the shirt on the spin cycle of the washing machine. If using a brand new shirt, wash it first to remove “size” to prevent dye bonding and a streaky effect.
Mix Your Dyes:
Follow the dye kit instructions: Most kits provide specific instructions for mixing the dye.
Use squeeze bottles: Dye bottles with squeeze tops make it easier to apply the dye evenly.
Mix your colors: You can mix colors in different ratios to create unique shades.
Dye kits can be purchased easily in craft stores and single packages, which come with urea, soda ash, and instructions for mixing. However, if you don’t have squeeze bottles, you can purchase them separately. Procion dyes, supplied by Dharma Dye, are recommended for their brightness and quality. They have a great website for purchasing all necessary supplies. If mixing the dye powder yourself, wear a mask to prevent inhalation.
Fold and Tie the T-shirt:
Choose a design: Some popular techniques include the swirl, crinkle, and spiral methods.
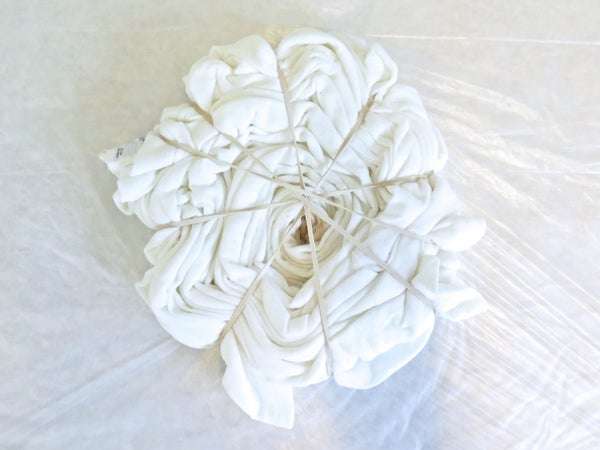
Twist and fold: Twist the shirt, and secure it with rubber bands to create sections for different colors.
Crumple or fold: For a more subtle look, you can crumple the shirt and apply the dye directly.
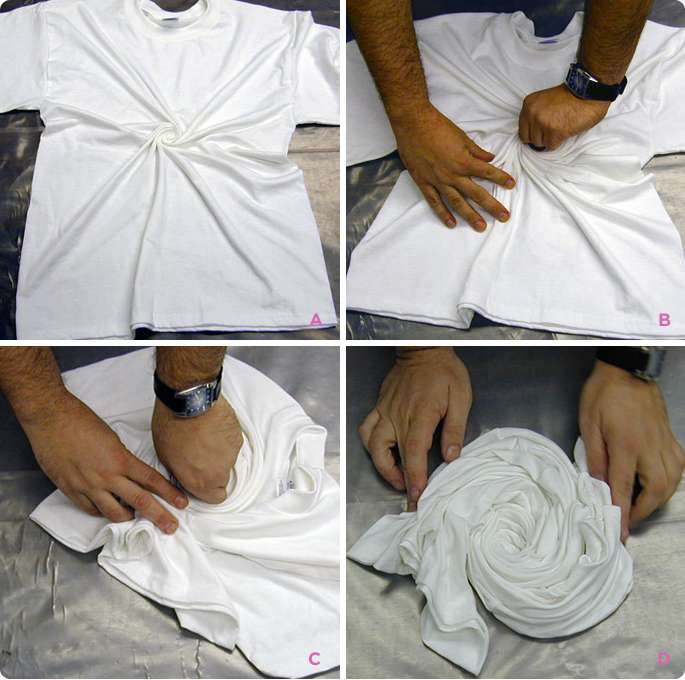
Lay your damp T-shirt (or fabric) out flat onto your plastic covered work surface. Pick out a folding pattern you’d like to try, and you can go online to see many creative ideas. Here is one website with a few different tie-dye techniques!
One of the most popular is the Spiral Tie-Dye Technique. To make a perfect center spiral, locate the center of the collar and the section just under the sleeves. This is your center point for your spiral tie dye! Pinch the fabric at this point and twist into a swirl. Place the dowel rod, (or your finger, or a wooden clothes pin) in the center of the shirt and start turning clockwise until you have a nice flat pie shape. Keep twisting the fabric tightly until the entire shirt is formed into a spiral shape. Use 3 rubber bands to hold your spiraled shirt in place, crisscrossing the rubber bands to create 6 wedge shapes.
Apply the Dye:
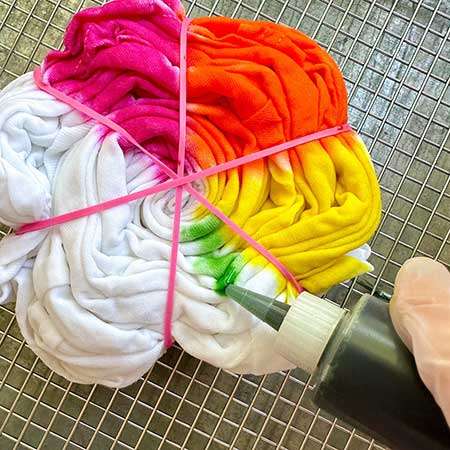
Place your tied garment on a protected surface: This will help prevent staining your work area.
Gently squeeze dye into the folds: Make sure the dye penetrates all layers of the fabric.
Flip the garment: Dye the other side as well to ensure even coverage.
To create a rainbow swirl shirt, place the shirt “pie” on paper towels and a plastic-protected surface. Use three colors: Fuchsia red, turquoise, and lemon yellow. Imagine the shirt as a pie chart and dye one third of the shirt lemon yellow, the second third fuchsia red, and the final third turquoise. Avoid wagging the bottle, as it will make a mess. Overlay the colors at the edges of each section to create green, purple, and orange colors. Wear rubber gloves.
Let the Dye Set:
Seal the garment in a plastic bag: This helps to keep the dye from drying out and ensures even color penetration.
Let it sit for at least 8 hours: For optimal results, allow the garment to sit for 24-36 hours.

Place your dyed project into a sealable plastic bag or wrap in plastic wrap to keep it damp while the dye completely processes. This will take 6 to 8 hours or overnight if you want to give it some extra time. Note: It’s important for the fabric to remain damp while the dye sets so it can fully absorb into the fabric fibers.
Rinse, Wash, and Wear:
Rinse the garment: Rinse it thoroughly under cool water until the water runs clear.
Wash separately: Wash the tie-dyed shirt separately or with similar colors in the washing machine.
Dry: Tumble dry or air dry the garment.
Take the shirt out of the bag! You can either take the bands off first, unwrap and start running the shirt under a cold water tap, or just run under the tap for a while and then take the bands off! BEWARE, if you have never tie dyed before you will be astonished at the amount of dye that pours out as you are rinsing. The water might turn black! Fear not, this is normal. All the dye you so lovingly applied will never bond with the fabric. Enough dye will remain, well and truly bonded. Keep rinsing until the water runs clear (it may take a while!)
Pro Tips:
Use gloves: Wearing gloves will help protect your hands from dye stains.
Work on a protected surface: Cover your workspace with a plastic sheet or newspaper to protect it from dye spills.
Experiment with different techniques: Tie-dyeing is a creative process, so feel free to experiment with different designs and techniques.